

The first thing to mention is that we're getting into some fairly technical aspects of photography here, so this may be a little harder to understand than some of the other 'more info' sections!
Long exposure photography is all about using slow shutter speeds to create an artistic effect - so for example silky waterfalls, car light trails at night, water rushing over pebbles on the beach, and so on.
Using a tripod
For these types of shots, it's vital to keep the camera steady so that only the moving elements of the scene are blurred - and anything which is not moving stays sharp. So you will need to use a tripod or other stable surface to balance your camera on - and a two second self timer to take the shot, so you don't move the camera when pressing the shutter.
Long exposures at night
Shooting long exposures at night is pretty straightforward, as the light is low and so your images don't over-expose while the shutter is open. But shooting long exposures in daylight can be more challenging. So we'll start with night-time shots . . .
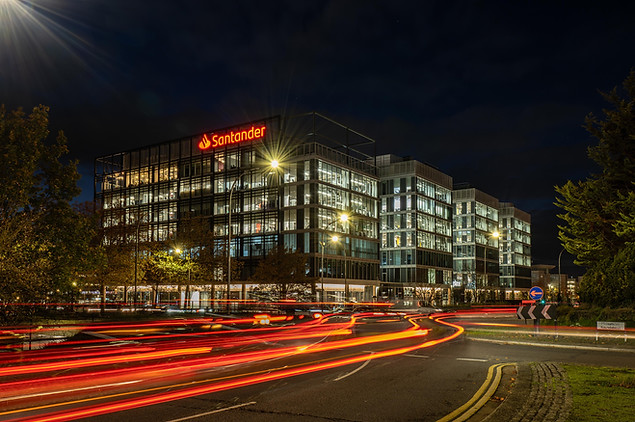
For a long exposure night shot - for example car light trails - the correct shutter speed will depend on the number of cars moving through the scene and their speed, so you have to experiment. I usually start on around 10 seconds and then increase or decrease the shutter speed from there if necessary. This will mean shooting in Manual (M on the top PASM mode dial) - setting your aperture to the mid-point for your sensor, and the ISO as low as it will go.
Take your first test shot and review the image. If the overall result is too dark, increase your ISO slightly and try again - or alternatively you could reduce your shutter speed - but this will alter the artistic effect of the shot.
If the shot is too light (usually due to higher levels of street lighting etc.) then make your aperture smaller (bigger f number) and try again. It's very much trial and error, and will depend on the overall light levels available in the scene.
Long exposures during the day
For long exposure shots during the day, you may get away with a similar process if it's a very dull day, or if you are shooting in a dark area such as thick woodland. This is often the location for waterfalls, meaning that it is sometimes possible to get that 'silky' water effect without additional equipment.
For waterfalls, as the water is moving fast anyway, even a second can be a long enough shutter speed, but that can still cause your shot to over-expose in daylight. You will need the lowest possible ISO and a narrow aperture - so try around f16 to start with, and if this still over-exposes go all the way up to f22. Again, it's a balancing act - so if the shot is still too bright try half a second exposure instead, as this is still often enough to create a nice effect on fast moving water.

Using a Neutral Density (ND) filter
For slower-moving subjects, such as waves or clouds - or for waterfalls in non-shaded locations - it is not possible to create long exposure shots without something known as a 'neutral density' or 'ND' filter. This is basically like sunglasses for your camera, to cut out light, and it screws on the front of your lens.
Check that your lens has a filter ring before buying an ND filter, and find out what size filter thread you need. Most kit lenses are around 52mm to 58mm diameter but make sure you look first.
ND filters come in different strengths, or 'darknesses', for different types of shot and lighting conditions. You can also buy variable ones, which can be adjusted - but I have found these usually give a pink colour cast so I prefer not to use them myself.
As a start-point I usually recommend a '3 stop' or a '6 stop' ND filter, which cut out 3 or 6 'f stops' of light respectively. You may also see these referred to as an 'ND8' (3 stop) and an 'ND64' (6 stop). I buy the Urth brand - www.urth.co - which are excellent, and also fairly good value.
Once you have an ND filter, you can then successfully take long exposure shots in daylight without them over-exposing, as you are cutting out light - which means you can leave the shutter open for longer than you normally would. Start off with the correct mid-point aperture for your sensor and the lowest possible ISO - then your shutter speed will depend on the speed of the moving element.
A waterfall in a bright location, or waves on a beach, may only need a 1 or 2 second exposure for example, but moving clouds may need 30 seconds or more in order to show movement. Again it's all about experimentation - and will depend very much on the available light in the scene, and the speed of movement.
If your first shot is too light, even with the ND filter (more likely with the 3-stop filter) make your aperture narrower and try again. Alternatively you can reduce your shutter speed, but you won't be able to capture as much motion blur as you would with a longer exposure.
If your shot is too dark (more likely with the 6-stop filter), you can make your shutter speed even longer, and/or increase your ISO until the exposure is correct.
For longer exposures, be very careful not to touch the tripod or the camera while the shutter is open, as this will cause the whole image to be blurry!
Return to the PTiYP app to continue.
If you don't have the app installed already, you can download it from the Google PlayStore now. The iPhone version is currently being developed, please email me if you would like to be notified when it becomes available.
For information on my 1-2-1 tuition services - which are available in person, or online via Zoom - please visit my photography tuition page.
I can help with anything from off-auto level tuition and learning how operate your specific camera - through to advanced skills, image editing and portfolio reviews.